
 |
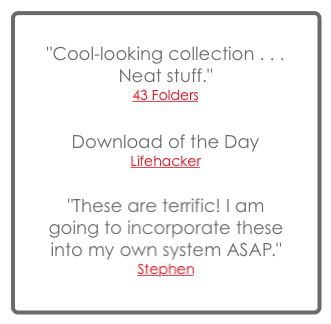
hipster pda templatesAll great hardware needs equally great software. And when the hardware is paper, the software must be ink. + find out more+ what's a hipster pda?Introduced in 2004 by Merlin Mann, a San Francisco-based writer and curator of the popular "lifehack" website 43 Folders, the Hipster PDA (hPDA) is the ultimate unplugged personal organizer. An hPDA consists of a stack of 3x5 cards and a binder clip. That's it. In the years since, the lifehack community has responded to Merlin's great idea with an astounding range of innovative adaptations. Among the most popular is the use of Rollabind rings in place of the binder clip. This technique (which I've been using exclusively since June 2006) reached its pinnacle of achievement with the recent introduction of the Levenger CircaPDA product line. + what are hpda templates?The templates are designed to to mimic the most useful note-taking and organizing functions of an electronic PDA in a 3x5 format. Each template has been repeatedly field-tested and refined in my own hPDA. Inspired by Laurent Baumann's brilliant Flat WhiteBezel icon set, the templates are designed to take maximum advantage of the limited real estate of the 3x5 card. The design favors writing space over boundaries. The borders and text are gray to allow your writing to dominate the page. + how do i use the templates?Templates are now available as both .png graphics and scalable vector .pdf documents. Simply click on the preferred file type. Templates can be printed as-is or inserted into a formatted document. They can be resized to fit everything from a 3x5 card to a daily organizer to an 8.5x11 sheet. Kvet.ch features an excellent article on how to print D*I*Y Planner hPDA cards (see the end of this page) directly to 3x5 cards for Mac users. The technique should also work nicely with the templates offered here. The templates are licensed under a Creative Commons Attribution-Noncommercial-Share Alike 3.0 license (see below). Suggestions for improvements and new templates are always welcome. If you would like to customize a template, I will be happy to send you the original OmniGraffle source file; in exchange, I can host your modified templates to share with other users. + see the templates+ organization & lists
+ reference
+ travel & navigation
+ research & note taking
+ for crafters
+ just for fun
find out more about hPDAphone templates: + you might also enjoy these templates . . .
cardnetsExperience the evolution of notetaking with Active Voice's innovative networked cards. CardNets -- now paper can be networked, too.
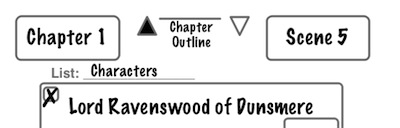
+ find out more+ what are cardnets?CardNets are the next evolutionary step in card-based notetaking. While traditional note cards are stacked in linear sequence, CardNets let you create networks that express dynamic relationships among cards! You can create networks that express as many different relationships between your notes as you can imagine. And don't worry about shuffling CardNets; by using the navigational icons to indicate spatial relationships between cards, you can impose as much or as little order as you want! In fact, CardNets are designed to be shuffled. CardNets use the same design principles as the popular Active Voice hPDA templates. Inspired by Laurent Baumann's brilliant Flat WhiteBezel icon set, CardNets are designed to take maximum advantage of the limited real estate of 3x5 and 4x6 cards. The design favors creative space over boundaries. The elements are gray to allow your words and drawings to dominate the page. CardNets are licensed under a Creative Commons Attribution-No Derivative Works 3.0 license (see below). CardNets were designed with professional trainers, coaches, and educators in mind -- you are encouraged to print and sell CardNets as part of your instructional kits and programs! + how do i use cardnets?CardNets are easy to learn. Every card has three components: navigational elements, identfication elements, and a notetaking area.
Currently available CardNets include the complete 3x5 Core set and blank 4x6 Core cards, available as both .png graphics and scalable vector .pdf documents. Simply click on the preferred file type. Templates can be printed as-is or inserted into a formatted document. + see the cardnets+ 3x5 core set
+ 4x6 core set
paperjamming file management templatesJust because your files have a life of their own doesn't mean that they have to run yours. Experience personalized file management made fun. + find out more+ what is paperjamming?PaperJamming templates help you manage your files on the fly by distilling professional information management practices into clear, easy-to-grasp guidelines. Templates are available for Core Files (permanent files that you keep to fulfill legal, business, and contractual requirements), Administrative files (standardized files that support your business functions, such as templates and forms, timesheets and invoices, and some types of correspondence), Project files (files of every type related to specific projects that you're working on), and Reference files (things that you did not create yourself, but collected to assist with a Core, Administrative, or Project activity, such as a magazine or book). Templates come pre-loaded with guidelines for the most common types of files created and used by freelancers. Plus, there's a blank template for listing extra files. Put the templates in your hPDA so you can manage files on-the-go, or drop them into file folders for easy reference. Or create a binder of frequently-used templates that you can add to and subtract from as needed. Whatever works best for you, and however you organize your work, PaperJamming templates can help. Best of all, PaperJamming is compatible with just about every great organization technique out there. Are you implementing GTD? A Franklin Covey fan? Can’t live without your D*I*Y Planner? Do you file everything into 43 Folders? Think of PaperJamming as a freeware widget that runs on those operating systems. find out more about paperjamming: + how do i use paperjamming file management templates?PaperJamming is all about finding ways to integrate file management into your personal business workflow. It's about recognizing that what happens to your files is as important as how and why you use them. What you do with a file (e-mails, MS Office documents, photos, PDFs, blog entries, etc.) is determined by where that file falls on each of two scales:
You decide everything else -- where to store them, how to arrange them, what to name them, when to face them -- yourself, in a way that works for you. As long as you know what Type and Stage a file falls under, you know what to do with it and when it's supposed to be done. Remember, while the guidelines suggested in the PaperJamming templates are based on sound records management principles, you should always check them against your actual financial, legal, and contractual requirements first. + see the paperjamming templates
iphone wallpapersDesigned using the same fonts, colors, and icon styles as your iPhone, you'll forget that they didn't come installed.
+ find out more+ how do i install the wallpapers?Simply drop the "iPhone Wallpapers" folder in your "Pictures" folder on your Mac. The next time you sync your iPhone with your computer, iTunes will automatically copy the folder to your iPhone. (If you have set iTunes to sync a different picture folder, then just drop the "iPhone Wallpapers" folder in that folder.) The wallpapers are licensed under a Creative Commons Attribution-Noncommercial-Share Alike 3.0 license (see below). Suggestions for improvements and new wallpapers are always welcome. If you would like to customize a wallpaper, I will be happy to send you the original OmniGraffle source file; in exchange, I can host your modified wallpapers to share with other users. + how do i use the wallpapers?When the sync is complete, tap on the "Photos" icon on the main menu screen. Select the "iPhone Wallpapers" folder and scroll to the desired wallpaper. Tap the image once, then tap the wallpaper icon in the lower left corner to select the image as your wallpaper. Move and scale the image so that the horizontal lines above and below the image align with the edges of the upper and lower boxes that appear on the screen. When you're done, tap the image again to use it as your wallpaper. That's all there is to it! The next time you wake your computer from sleep, the Active Voice wallpaper will be in place, ready for use. + see the wallpapers
active voice:
|
|||||||||||||||||||||||||||||||||||||||||||||||||||||||||||||||||||||||||||||||||||||||||||||||||||||||||||||||||||||||||||||||||||||||||||||||||||||||||||||||||||||||||||||||||||||||||||||||||||||||||||||||||||||||||||||||||||||||||||||||||||||||||||||||||||||||||||
 Click
on the headings below to begin exploring the range of free
productivity templates and iPhone wallpapers that Active Voice offers.
Click
on the headings below to begin exploring the range of free
productivity templates and iPhone wallpapers that Active Voice offers.


